The 12 Kameleoon days of Christmas: part 7
Ensuring that your experimentation results are reliable is vital, and stopping your test too early is one of the most common mistakes that people make when running programs.
Today’s Kameleoon hidden feature spotlight explains how our platform gives you all the data you need to make an informed decision on when it is time to end your experiment and still receive reliable results.
1 Confidence stability over time
Testing results need to reach a significance level before they can be considered reliable - as we describe in our in-depth blog on when to stop a test.
However, as the blog says, simply hitting a significance level of 95% isn’t enough on its own to necessarily give you reliable results. You need this confidence level to remain stable over time - you have to look at the trends in your results, rather than simply pressing stop as soon as you hit your target.
Kameleoon gives you immediate access to the full range of data for each and every one of your KPIs, allowing you to make more informed decisions.

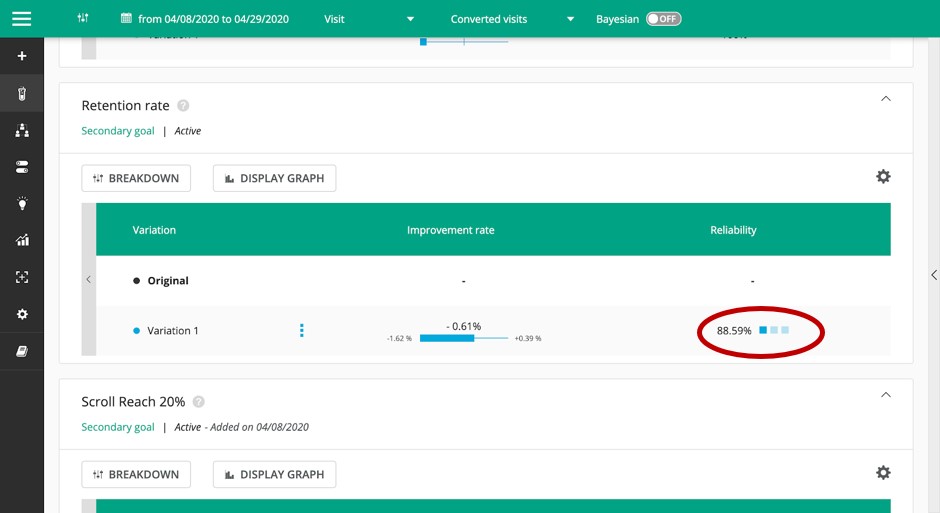
At a high level the platform provides a graphical view of reliability. In the example above the significance rate is almost at 90%, however, only one box is illuminated, which means that the "stability trend" we are looking for is not yet there, showing that results are not yet stable, making them unreliable. Three illuminated boxes mean that the significance rate has been fluctuating by less than 5% over a period of seven days, and the experiment can then be stopped with high confidence towards the data displayed.
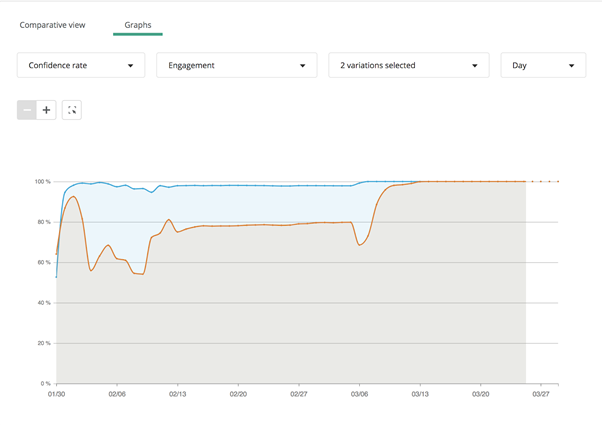
You can also view reliability over time as a graph, showing how trends evolve. The blue line shows confidence levels - as you can see it would have been tempting to end the experiment much earlier, after one or two weeks, but in fact the curve only flattens much later. This means that the results have stabilized and that you can use this data with confidence.

Find out more about how Kameleoon measures and displays statistical significance in our developer documentation - and come back tomorrow to learn how we make it simpler to view and organize your results against KPIs.

Read more in the series here:
- Day 1: Visualization of modified/tracked elements on a page
- Day 2: Reallocating traffic in case of issues
- Day 3: Simulation mode: visit and visitor generator
- Day 4: Click tracking: automatically send events to analytics tools such as Google Analytics
- Day 5: Adding a global code to an experiment
- Day 6: Excluding time periods from results
- Day 7: Measuring confidence stability
- Day 8: Switching to custom views
- Day 9: Using custom data for cross-device reconcilation
- Day 10: Personalization campaign management
- Day 11: Adding CSS selectors
- Day 12: Changing hover mode


